Android(三)App启动流程
一、简介
现在App启动在面试中经常出现,这里做一个记录。
二、流程
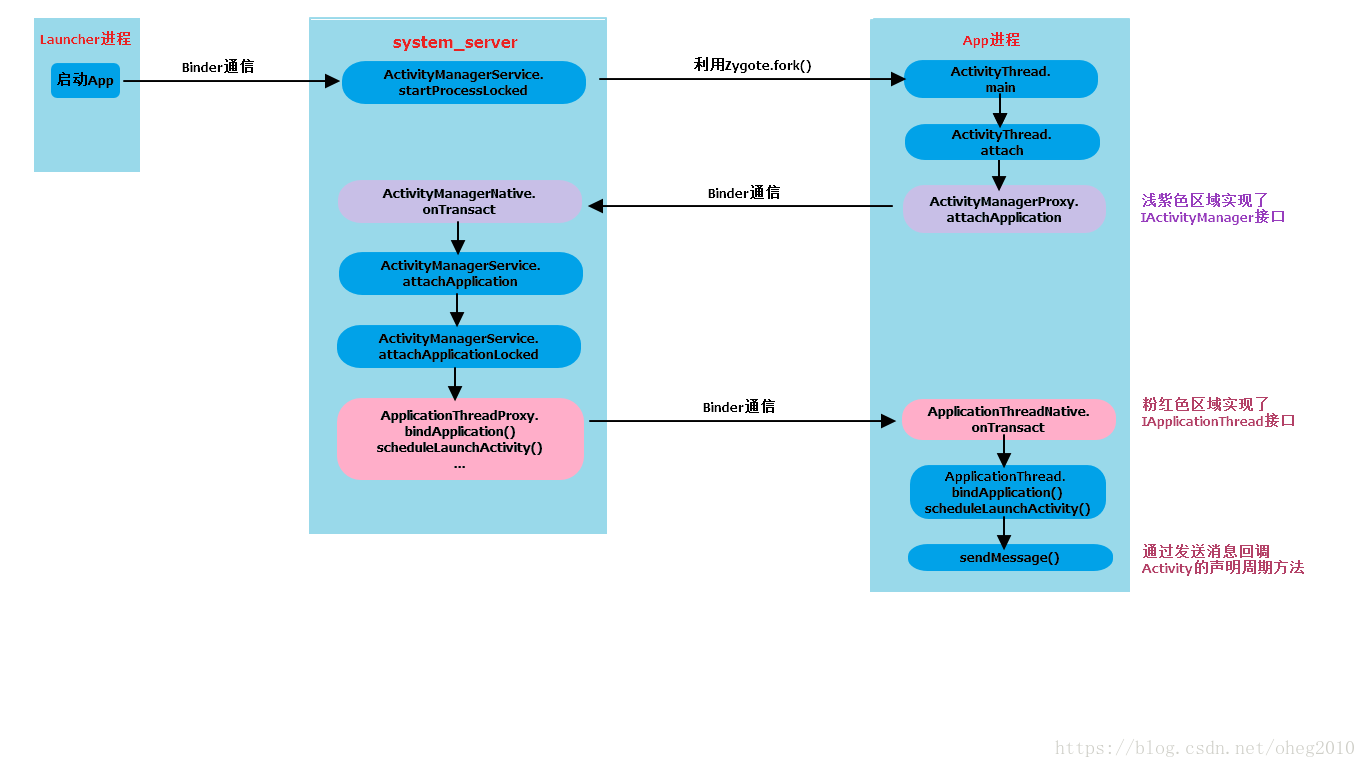
1. 点击桌面图标后,Launcher通过Binder进程间通信机制通知AMS(ActivityManagerService)要启动一个Activity。
2. AMS收到消息后就把要启动的Activity保存到ActivityRecord对象,并且通过Binder进程间通信机制通知Launcher进入Paused。
3. Launcher通过Binder进程间通信机制通知AMS,它已经准备就绪进入Paused状态。
4. AMS开始从进程中找Activity相应的进程,如果已经启动就直接拉到前台进程,如果不存在进程,就进入冷启动流程,利用Zygote.fork()创建一个进程,并且实例一个ActivityThread对象,启动ActivityThread.main()方法。即将要启动的Activity就是在这个ActivityThread实例中运行。
5. ActivityThread通过Binder进程间通信机制将一个ApplicationThread类型的Binder对象传递给AMS,以便以后AMS能够通过这个Binder对象和它进行通信。
6. AMS通过Binder进程间通信机制通知ActivityThread,现在一切准备就绪,它可以真正执行Activity的启动操作了。
三、流程分析
1. 当点击图标后,Launcher会调用startActivitySafely方法,intent中携带需要启动App的关键信息也就是我们在配置文件中配置的默认启动页信息,其实在App安装的时候,Launcher已经将启动信息记录下来了,图标只是一个快捷方式的入口。startActivitySafely的方法最终还是会调用Activity的startActivity方法。
@Override
public void startActivity(Intent intent, @Nullable Bundle options) {
    if (options != null) {
        startActivityForResult(intent, -1, options);
    } else {
        // Note we want to go through this call for compatibility with
        // applications that may have overridden the method.
        startActivityForResult(intent, -1);
    }
}
而startActivity最后还是调用startActivityForResult方法。这里startActivityForResult的方法中code为-1,表示startActivity并不关心是否启动成功。
public void startActivityForResult(@RequiresPermission Intent intent, int requestCode,
        @Nullable Bundle options) {
    if (mParent == null) {
        options = transferSpringboardActivityOptions(options);
        Instrumentation.ActivityResult ar =
            mInstrumentation.execStartActivity(
                this, mMainThread.getApplicationThread(), mToken, this,
                intent, requestCode, options);
        if (ar != null) {
            mMainThread.sendActivityResult(
                mToken, mEmbeddedID, requestCode, ar.getResultCode(),
                ar.getResultData());
        }
        if (requestCode >= 0) {
startActivityForResult方法中又会调用mInstrumentation.execStartActivity方法,其中有一个参数:
mMainThread.getApplicationThread()得到的是一个Binder对象,代表Launcher所在的App的进程,mToken实际也是一个Binder对象,代表Launcher所在的Activity通过Instrumentation传给AMS,这样AMS就知道是谁发起的请求。
ActivityThread是在启动APP的时候创建的,ActivityThread代表应用程序,而我们开发中常用的Application其实是ActivityThread的上下文,在开发中我们经常使用,但在Android系统中其实地位很低的。
2. mInstrumentation.execStartActivity
instrumentation在测试的时候经常用到,instrumentation的官方文档:http://developer.android.com/intl/zh-cn/reference/android/app/Instrumentation.html,我们主要接着看mInstrumentation.execStartActivity方法:
public Instrumentation.ActivityResult execStartActivity(Context who, IBinder contextThread, IBinder token, Activity target, Intent intent, int requestCode, Bundle options) {
    IApplicationThread whoThread = (IApplicationThread)contextThread;
    if(this.mActivityMonitors != null) {
        Object e = this.mSync;
        synchronized(this.mSync) {
            int N = this.mActivityMonitors.size();

            for(int i = 0; i < N; ++i) {
                Instrumentation.ActivityMonitor am = (Instrumentation.ActivityMonitor)this.mActivityMonitors.get(i);
                if(am.match(who, (Activity)null, intent)) {
                    ++am.mHits;
                    if(am.isBlocking()) {
                        return requestCode >= 0?am.getResult():null;
                    }
                    break;
                }
            }
        }
    }

    try {
        intent.setAllowFds(false);
        intent.migrateExtraStreamToClipData();
        int var16 = ActivityManagerNative.getDefault().startActivity(whoThread, intent, intent.resolveTypeIfNeeded(who.getContentResolver()), token, target != null?target.mEmbeddedID:null, requestCode, 0, (String)null, (ParcelFileDescriptor)null, options);
        checkStartActivityResult(var16, intent);
    } catch (RemoteException var14) {
        ;
    }

    return null;
}
其实这个类是一个Binder通信类,相当于IPowerManager.java就是实现了IPowerManager.aidl,我们再来看看getDefault这个函数:
public static IActivityManager getDefault() {
    return (IActivityManager)gDefault.get();
}
getDefault方法得到一个IActivityManager,它是一个实现了IInterface的接口,里面定义了四大组件的生命周期:
public static IActivityManager asInterface(IBinder obj) {
    if(obj == null) {
        return null;
    } else {
        IActivityManager in = (IActivityManager)obj.queryLocalInterface("android.app.IActivityManager");
        return (IActivityManager)(in != null?in:new ActivityManagerProxy(obj));
    }
}
最终返回一个ActivityManagerProxy对象也就是AMP,AMP就是AMS在客户端的代理对象,说到代理其实就是代理模式。
AMP的startActivity方法:
public int startActivity(IApplicationThread caller, Intent intent, String resolvedType, IBinder resultTo, String resultWho, int requestCode, int startFlags, String profileFile, ParcelFileDescriptor profileFd, Bundle options) throws RemoteException {
    Parcel data = Parcel.obtain();
    Parcel reply = Parcel.obtain();
    data.writeInterfaceToken("android.app.IActivityManager");
    data.writeStrongBinder(caller != null?caller.asBinder():null);
    intent.writeToParcel(data, 0);
    data.writeString(resolvedType);
    data.writeStrongBinder(resultTo);
    data.writeString(resultWho);
    data.writeInt(requestCode);
    data.writeInt(startFlags);
    data.writeString(profileFile);
    if(profileFd != null) {
        data.writeInt(1);
        profileFd.writeToParcel(data, 1);
    } else {
        data.writeInt(0);
    }
主要就是将数据写入AMS进程,等待AMS的返回结果,这个过程是比较枯燥的,因为我们做插件化的时候只能对客户端Hook,而不能对服务端操作,所以我们只能静静的看着。
3. AMS处理Launcher的信息
在流程中有一步是AMS通过IBinder通知Launcher进入Paused状态,它这里是怎么进行的呢。
Binder的通信是平等的,谁发消息谁就是客户端,接收的一方就是服务端,前面已经将Launcher所在的进程传过来了,AMS将其保存为一个ActivityRecord对象,这个对象中有一个ApplicationThreadProxy即Binder的代理对象,AMS通ApplicationTreadProxy发送消息,App通过ApplicationThread来接收这个消息。
Launcher收到消息后,再告诉AMS,可以启动了并且进入Paused,ApplicationThread调用ActivityThread的sendMessage方法给Launcher主线程发送一个消息。这个时候AMS去Zygote fork一个新的进程(Process.start方法),并且创建ActivityThread,指定main函数入口。
启动新进程的时候为进程创建了ActivityThread对象,这个就是UI线程,进入main函数后,创建一个Looper,也就是mainLooper,并且创建Application,所以说Application只是对开发人员来说重要而已。创建好后告诉AMS,App启动好了,AMS就记录了这个APP的登记信息,以后AMS通过这个ActivityThread向APP发送消息。
ActivityThread通过ApplicationThread与AMS进行通信,ApplicationThread通过H与ActivityThread进行通信(handler机制),处理Activity的事务
public static void main(String[] args){
    ...
    Looper.prepareMainLooper();
    //初始化Looper
    ...
    ActivityThread thread = new ActivityThread();
    //实例化一个ActivityThread
    thread.attach(false);
    //这个方法最后就是为了发送出创建Application的消息
    ...
    Looper.loop();
    //主线程进入无限循环状态,等待接收消息
}
public void attach(boolean system){
...
//获得IActivityManager实例
final IActivityManager mgr = ActivityManagerNative.getDefault();
try {
// ApplicationThread跨进程Binder对象mAppThread
mgr.attachApplication(mAppThread);
} catch (RemoteException ex) {
throw ex.rethrowFromSystemServer();
}
...
}可以看到这里把AIDL反向回调通讯注册到了AMS里面,然后那必然操作又切回到了系统的AMS进程里,接着 AMS里面的代码走到了 attachApplicationLocked 这个位置。
attachApplicationLocked 方法很重要,期中执行了2个操作,先创建 application 对象,再创建 Activity 对象,这2个方法可是串行执行的,都是 AIDL 远程操作。
//
private final boolean attachApplicationLocked(IApplicationThread thread,
        int pid) {
    ....
    // 创建 application 对象
    thread.bindApplication(processName, appInfo, providers,
            app.instr.mClass,
            profilerInfo, app.instr.mArguments,
            app.instr.mWatcher,
            app.instr.mUiAutomationConnection, testMode,
            mBinderTransactionTrackingEnabled, enableTrackAllocation,
            isRestrictedBackupMode || !normalMode, app.persistent,
            new Configuration(getGlobalConfiguration()), app.compat,
            getCommonServicesLocked(app.isolated),
            mCoreSettingsObserver.getCoreSettingsLocked(),
            buildSerial);
    ...

    // 然后再创建 Activity 对象
    if (normalMode) {
        try {
            if (mStackSupervisor.attachApplicationLocked(app)) {
                didSomething = true;
            }
        } catch (Exception e) {
            ...
        }
    }
    ...
}

boolean attachApplicationLocked(ProcessRecord app) throws RemoteException {
    final String processName = app.processName;
    ...
    if (realStartActivityLocked(activity, app,
            top == activity /* andResume */, true /* checkConfig */)) {
        ...
    }
    ...
}

final boolean realStartActivityLocked(ActivityRecord r, ProcessRecord app,
        boolean andResume, boolean checkConfig) throws RemoteException {
    ...
    app.thread.scheduleLaunchActivity(new Intent(r.intent), r.appToken,
            System.identityHashCode(r), r.info,
            // TODO: Have this take the merged configuration instead of separate global
            // and override configs.
            mergedConfiguration.getGlobalConfiguration(),
            mergedConfiguration.getOverrideConfiguration(), r.compat,
            r.launchedFromPackage, task.voiceInteractor, app.repProcState, r.icicle,
            r.persistentState, results, newIntents, !andResume,
            mService.isNextTransitionForward(), profilerInfo);
    ...
可以看见 attachApplicationLocked 又通过 ApplicationThread 回调,让 UI 进程干活了,注意这个 ApplicationThread 所在的进程就不是我们发起 startActivity 的 LaunchActivity 所在的进程了,而是我们刚刚 fork 出来的目标进程了。
接着我们来看看 UI 进程的 bindApplication 方法:
public final void bindApplication(String processName, ApplicationInfo appInfo,
        List<ProviderInfo> providers, ComponentName instrumentationName,
        ProfilerInfo profilerInfo, Bundle instrumentationArgs,
        IInstrumentationWatcher instrumentationWatcher,
        IUiAutomationConnection instrumentationUiConnection, int debugMode,
        boolean enableBinderTracking, boolean trackAllocation,
        boolean isRestrictedBackupMode, boolean persistent, Configuration config,
        CompatibilityInfo compatInfo, Map services, Bundle coreSettings,
        String buildSerial) {
    ...
    sendMessage(H.BIND_APPLICATION, data);
}

private void sendMessage(int what, Object obj) {
    sendMessage(what, obj, 0, 0, false);
}

private void sendMessage(int what, Object obj, int arg1, int arg2, boolean async) {
    if (DEBUG_MESSAGES) Slog.v(
        TAG, "SCHEDULE " + what + " " + mH.codeToString(what)
        + ": " + arg1 + " / " + obj);
    Message msg = Message.obtain();
    msg.what = what;
    msg.obj = obj;
    msg.arg1 = arg1;
    msg.arg2 = arg2;
    if (async) {
        msg.setAsynchronous(true);
    }
    mH.sendMessage(msg);
}
ApplicationThread 发送了一个 H.BIND_APPLICATION 的消息,该消息会由 ActivityThread 一个名叫 H 的 handle内部类接收:
//
public void handleMessage(Message msg) {
    ...
    switch (msg.what) {
        ...
        case BIND_APPLICATION:
            Trace.traceBegin(Trace.TRACE_TAG_ACTIVITY_MANAGER, "bindApplication");
            AppBindData data = (AppBindData)msg.obj;
            handleBindApplication(data);
            Trace.traceEnd(Trace.TRACE_TAG_ACTIVITY_MANAGER);
            break;
        ...
    }
}

private void handleBindApplication(AppBindData data) {
    ...
    final InstrumentationInfo ii;
    ...
    // 创建 mInstrumentation 实例
    if (ii != null) {
        final ApplicationInfo instrApp = new ApplicationInfo();
        ii.copyTo(instrApp);
        instrApp.initForUser(UserHandle.myUserId());
        final LoadedApk pi = getPackageInfo(instrApp, data.compatInfo,
                appContext.getClassLoader(), false, true, false);
        final ContextImpl instrContext = ContextImpl.createAppContext(this, pi);

        try {
            final ClassLoader cl = instrContext.getClassLoader();
            mInstrumentation = (Instrumentation)
                cl.loadClass(data.instrumentationName.getClassName()).newInstance();
        } catch (Exception e) {
            ...
        }
        ...
    } else {
        mInstrumentation = new Instrumentation();
    }
    ...
    Application app;
    ...
    // 创建 Application 实例
    try {
        ...
        app = data.info.makeApplication(data.restrictedBackupMode, null);
        mInitialApplication = app;
        ...
        try {
            mInstrumentation.callApplicationOnCreate(app);
        } catch (Exception e) {
            ...
        }
    } finally {
        ...
    }
    ...
}

public Application makeApplication(boolean forceDefaultAppClass,
        Instrumentation instrumentation) {
    Application app = null;

    String appClass = mApplicationInfo.className;
    if (forceDefaultAppClass || (appClass == null)) {
        appClass = "android.app.Application";
    }

    try {
        java.lang.ClassLoader cl = getClassLoader();
        ...
        ContextImpl appContext = ContextImpl.createAppContext(mActivityThread, this);
        app = mActivityThread.mInstrumentation.newApplication(
                cl, appClass, appContext);
        appContext.setOuterContext(app);
    } catch (Exception e) {
        ...
    }
    mActivityThread.mAllApplications.add(app);
    mApplication = app;

    if (instrumentation != null) {// 传入为 null 所以不走
        try {
            instrumentation.callApplicationOnCreate(app);
        } catch (Exception e) {
            ...
        }
    }
    ...
    return app;
}

static public Application newApplication(Class<?> clazz, Context context)
        throws InstantiationException, IllegalAccessException,
        ClassNotFoundException {
    Application app = (Application)clazz.newInstance();
    app.attach(context);
    return app;
}
该 handle 会创建一个 mInstrumentation 实例,然后创建出上下文对象,application 对象,application 绑定上下文,mInstrumentation 对象会执行 application.onCreate() 初始化。
接下来是启动Activity,这个时候AMS根据之前的记录告诉APP应该启动哪个Activity。
流程:ApplicationThread.scheduleLaunchActivity() 方法里发送一个 H.LAUNCH_ACTIVITY 创建 activity 对象的消息,然后 ActivityThread 的 handle 接受消息,由 Instrumentation new activity 对象,activity 对象初始化参数,最后由 Instrumentation 执行 activity.onCreate() 初始化方法。
//
public final void scheduleLaunchActivity(Intent intent, IBinder token, int ident,
        ActivityInfo info, Configuration curConfig, Configuration overrideConfig,
        CompatibilityInfo compatInfo, String referrer, IVoiceInteractor voiceInteractor,
        int procState, Bundle state, PersistableBundle persistentState,
        List<ResultInfo> pendingResults, List<ReferrerIntent> pendingNewIntents,
        boolean notResumed, boolean isForward, ProfilerInfo profilerInfo) {
    ...
    sendMessage(H.LAUNCH_ACTIVITY, r);
}

public void handleMessage(Message msg) {
    ...
    switch (msg.what) {
        ...
        case LAUNCH_ACTIVITY: {
            Trace.traceBegin(Trace.TRACE_TAG_ACTIVITY_MANAGER, "activityStart");
            final ActivityClientRecord r = (ActivityClientRecord) msg.obj;

            r.packageInfo = getPackageInfoNoCheck(
                    r.activityInfo.applicationInfo, r.compatInfo);
            handleLaunchActivity(r, null, "LAUNCH_ACTIVITY");
            Trace.traceEnd(Trace.TRACE_TAG_ACTIVITY_MANAGER);
        } break;
        ...
    }
}

private void handleLaunchActivity(ActivityClientRecord r, Intent customIntent, String reason) {
    ...
    Activity a = performLaunchActivity(r, customIntent);
    ...
}

private Activity performLaunchActivity(ActivityClientRecord r, Intent customIntent) {
    ...
    Activity activity = null;
    try {
        java.lang.ClassLoader cl = appContext.getClassLoader();
        activity = mInstrumentation.newActivity(
                cl, component.getClassName(), r.intent);
        ...
    } catch (Exception e) {
        ...
    }

    try {
        // 返回之前创建过的 application 对象
        Application app = r.packageInfo.makeApplication(false, mInstrumentation);
        ...
        if (activity != null) {
            ...
            // attach 到 window 上
            activity.attach(appContext, this, getInstrumentation(), r.token,
                    r.ident, app, r.intent, r.activityInfo, title, r.parent,
                    r.embeddedID, r.lastNonConfigurationInstances, config,
                    r.referrer, r.voiceInteractor, window, r.configCallback);
            ...
            if (r.isPersistable()) {
                mInstrumentation.callActivityOnCreate(activity, r.state, r.persistentState);
            } else {
                mInstrumentation.callActivityOnCreate(activity, r.state);
            }
            ...
        }
    } catch (Exception e) {
        ...
    }
    return activity;
}

public Activity newActivity(ClassLoader cl, String className,
        Intent intent)
        throws InstantiationException, IllegalAccessException,
        ClassNotFoundException {
    return (Activity)cl.loadClass(className).newInstance();
}

public Activity newActivity(Class<?> clazz, Context context,
        IBinder token, Application application, Intent intent, ActivityInfo info,
        CharSequence title, Activity parent, String id,
        Object lastNonConfigurationInstance) throws InstantiationException,
        IllegalAccessException {
    Activity activity = (Activity)clazz.newInstance();
    ActivityThread aThread = null;
    activity.attach(context, aThread, this, token, 0 /* ident */, application, intent,
            info, title, parent, id,
            (Activity.NonConfigurationInstances)lastNonConfigurationInstance,
            new Configuration(), null /* referrer */, null /* voiceInteractor */,
            null /* window */, null /* activityConfigCallback */);
    return activity;
}
其中ActivityThread.ActivityClientRecord就是AMS传过来的App记录。
r.activityInfo.applicationInfo所得到的属性我们称之为LoadedApk,可以提取到apk中的所有资源,那么APP内部是如何页面跳转的呢,比如我们从ActivityA跳转到ActivityB,我们可以将Activity看作Launcher,唯一不同的就是,在正常情况下ActivityB和ActivityA所在同一进程,所以不会去创建新的进程。
到这 activity 的创建流程算是完事了,之后走 activity 的生命周期函数,再由 window 渲染界面显示,但是这里我们还要看看 activity.attach方法,看看 activity 初始化了什么参数,方面之后我们继续说 window。
final void attach(Context context, ActivityThread aThread,
        Instrumentation instr, IBinder token, int ident,
        Application application, Intent intent, ActivityInfo info,
        CharSequence title, Activity parent, String id,
        NonConfigurationInstances lastNonConfigurationInstances,
        Configuration config, String referrer, IVoiceInteractor voiceInteractor,
        Window window) {
    attachBaseContext(context);

    mFragments.attachHost(null /*parent*/);

    mWindow = new PhoneWindow (this, window);
    mWindow.setWindowControllerCallback(this);
    mWindow.setCallback(this);
    mWindow.setOnWindowDismissedCallback(this);
    mWindow.getLayoutInflater().setPrivateFactory(this);
    if (info.softInputMode != WindowManager.LayoutParams.SOFT_INPUT_STATE_UNSPECIFIED) {
        mWindow.setSoftInputMode(info.softInputMode);
    }
    if (info.uiOptions != 0) {
        mWindow.setUiOptions(info.uiOptions);
    }
    mUiThread = Thread.currentThread();

    mMainThread = aThread;
    mInstrumentation = instr;
    mToken = token;
    mIdent = ident;
    mApplication = application;
    mIntent = intent;
    mReferrer = referrer;
    mComponent = intent.getComponent();
    mActivityInfo = info;
    mTitle = title;
    mParent = parent;
    mEmbeddedID = id;
    mLastNonConfigurationInstances = lastNonConfigurationInstances;
    if (voiceInteractor != null) {
        if (lastNonConfigurationInstances != null) {
            mVoiceInteractor = lastNonConfigurationInstances.voiceInteractor;
        } else {
            mVoiceInteractor = new VoiceInteractor (voiceInteractor, this, this,
            Looper.myLooper());
        }
    }

    mWindow.setWindowManager(
            (WindowManager) context . getSystemService (Context.WINDOW_SERVICE),
            mToken, mComponent.flattenToString(),
            (info.flags & ActivityInfo . FLAG_HARDWARE_ACCELERATED) != 0);
    if (mParent != null) {
        mWindow.setContainer(mParent.getWindow());
    }
    mWindowManager = mWindow.getWindowManager();
    mCurrentConfig = config;
}
创建了 PhoneWindow 窗口,给窗口对象注册监听,通过窗口Window创建,初始参数赋值,把和 WindowManagerService 远程通讯的 WindowManagerImpl AIDL 对象绑定给 PhoneWindow。
App启动流程就到这了,基本结束了。
四、转载参考
1. APP启动流程解析
2. app 启动流程